10 Photoshop editing skills every photographer should know
Adobe Photoshop has long been the industry standard image-editing software for photographers. It’s a comprehensive and powerful program, and despite its reputation for being complicated it can actually be used with relative ease by photographers of all ability levels.
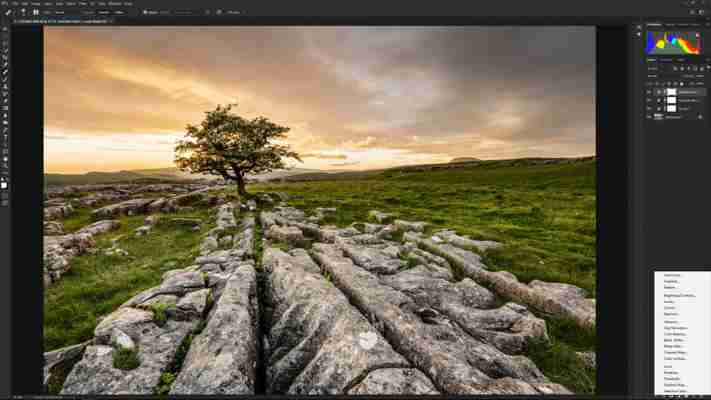
The possibilities it opens up are almost endless; from basic adjustments to high-end retouching to creating surreal composite images, Photoshop can do it all. So, whether you intend to make major adjustments to your shots or just minor tweaks, these 10 tips will help you do it faster and more effectively.
(opens in new tab) The best photo editor overall is: Adobe Photoshop (opens in new tab)
(opens in new tab)If you're serious about photo editing, or are thinking about turning your hobby into a job, you can't beat industry standard software Adobe Photoshop. It's certainly not free like the photo editors below, but it's surprisingly good value with an Adobe Creative Cloud subscription.
1. Using adjustment layers
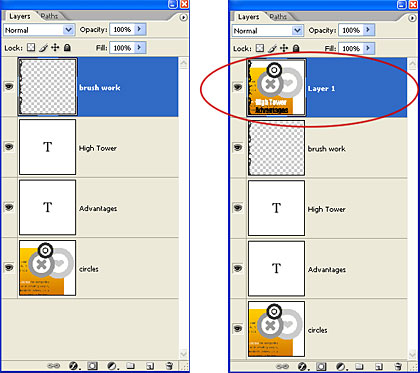
Adjustment layers are the professional way to apply edits to your images. Adjustment layers sit above the Background layer (your original image), and allow you to make multiple adjustments without altering the original image or degrading its quality. Adjustment layers are accessed by clicking on the half-white, half-black circle icon at the foot of the Layers panel. If you want to save an image with adjustment layers intact you'll need to save it as a TIFF or PSD – a JPEG is a flattened and compressed file type that doesn’t support layers.
2. Converting to black and white
If you’re planning to convert a color image to black & white you’ll almost certainly get better image quality by converting the raw file in Adobe Camera Raw or Lightroom. However, if you’re working on a JPEG file in Photoshop and want to convert it to mono, the Black & White adjustment layer is a powerful option. You can go for the default conversion, one of the 12 presets, or manually adjust how individual colors are converted to greyscale using the sliders.
3. The Camera Raw filter
The Camera Raw filter gives you access to all the controls available in Adobe Camera Raw within the standard Photoshop interface. This means that if you shoot in JPEG, or have already converted a raw file and would like to make an additional adjustment, you can do so with speed and ease. The best way to use this filter is to either make a copy of the Background layer, or merge the visible layers into a new layer at the top of the stack (select the top-most layer and press Ctrl/Cmd+Alt/Option+Shift+E), then go to Filter > Convert For Smart Filters. You can now apply the Camera Raw filter, and go back and edit your adjustments later if you wish.
4. Healing Brush
The Healing Brush is a great tool for performing retouching tasks ranging from simple dust spot removal to more complex object removal. To use the tool, hold down the Alt/Option key and click close to the area you want to retouch to sample the replacement pixels for the repair, then click and drag to brush the sampled pixels into the area you want to retouch.
If you’re unhappy with an edit press Ctrl+Z to go back a step (it's a good idea to work in short brush strokes so that you can step back without having to undo a large amount of editing). The tool works by blending the sampled pixels with the original pixels, rather than copying the sampled pixels wholesale like the Clone Stamp Tool.
5. Customize the workspace
The default Photography Workspace contains everything Adobe thinks is necessary for photographers using Photoshop, but one size rarely fits all, so it’s worth customizing the panel layout to suit your way of working. Panels on the right of the Photoshop interface can be removed by dragging them out of the dock, and new ones added by going to Window menu in the main menu bar and selecting the desired panel. These can then be dragged into position and docked with other panels, and the workspace saved. You can save multiple workspaces; to save or load a workspace go to Window > Workspace and select the relevant option.
6. Dodge and burn
An old darkroom technique, dodging and burning remains a popular method for adjusting the brightness of specific parts of your images. To use the Dodge and Burn tools you should be working on either the Background layer or a copy of it, as the tools are 'destructive', in that they permanently alter pixels. Now you can simply brush over an area with the Dodge Tool to lighten it, or with the Burn Tool to darken it. The tools can be set to target Shadows, Midtones or Highlights, so that only pixels within the selected tonal range that fall under the brush stroke are altered. It’s best to work with a low exposure such as 5-10% and build up the desired effect gradually.
In the days of film, contact sheets were an essential tool for reviewing and selecting images to print. And while image cataloguing software such as Lightroom and Capture One enables you to review images quickly and easily, it can still be useful to create contact sheets to be sent digitally to someone, or for print. To create a contact sheet put the desired images, or copies of them, in a folder. Then go to File > Automate > Contact Sheet II and configure options such as image source, paper size and layout. Once everything has been selected Photoshop will generate contact sheets to be saved manually.
8. Blending modes
Blending modes are a simple yet powerful tool for changing the way a layer interacts with the layer below. You can apply blending modes to any layer, including adjustment layers, to achieve a range of effects such as changing brightness, contrast and colors. A good way to see how they work is to make a copy of the Background layer by selecting it and pressing Ctrl+J. With the new layer active go to the dropdown menu at the top of the Layers panel – it's set to Normal by default – and experiment with the different blending modes.
9. Quick Mask mode for selections
Making selections is the key to compositing and making precise localized adjustments. There are a number of tools available for making selections, with those designed for making complex selections being more difficult to use. Quick Mask mode, on the other hand, makes making selections as easy as painting over an area. At a basic level, painting with a black brush creates the mask and white erases it, and using a feathered or hard brush creates a hard or soft edge for the selection. To enter Quick Mask mode press Q on the keyboard; once the mask has been created pressing Q again turns it into a selection.
10. Cropping
Cropping is a simple task that’s pretty much self-explanatory once you select the Crop Tool, but there are a number of advanced features you can take advantage of. By repeatedly pressing O on the keyboard you can cycle through the available guides including rule-of- thirds, golden ratio, golden spiral, while clicking on the cog symbol in the tool bar at the top of the interface will bring up additional display and other options. Clicking the Crop Tool icon at the far-left of the tool bar opens a menu containing presets, and you can create your own presets if you regularly crop images to particular sizes.
15 Essential Photoshop Skills You Should Know — RB.
This video is broken down into 15 parts:

1. Working with the UI and saving Workspaces
Understanding the Photoshop interface can be a little intimidating initially, especially if you're not familiar with design programs. However, once you get used to the interface Photoshop becomes much easier to function in. Photoshop also offers various workspaces for you to work in such as Photography, Design, and more. You can also customize and save your own workspace.
2. The PSD, New Documents, and Dragging in New Files
The PSD is the primary layered work file created by Adobe Photoshop when you save your work. You can create a PSD from a JPEG, TIFF, etc. you opened in Photoshop, and you can create brand new PSD from scratch.
3. Tabbed Documents and Navigating the Open Documents
Its very useful to be able to easily toggle between more than one open document in Photoshop. Dragging and moving document tabs is a great way to easily jump from one document to another and also drag layers from one document to another.
4. What, Why, and How of Layers
Layers are the stackable parts that make up your image in Photoshop. They allow you to edit, manipulate and alter different parts of your image without affecting other layers and original pixel information. Their visibility within an image is dependent on their transparency and blending. There are different types of layers for different purposes.
5. All About the Selection Tools
Selection Tools allow you to isolate certain areas of your image so you can make specific adjustments without affecting the entire image. They almost have a similar function as layers, but once you Deselect an area of an image, the rest of the image is subject to being adjusted with the area that was selected. This can get messy so it's best to use a combination of selection tools and layers to get the specific adjustments you're looking for.
6. The Move Tool
The Move Tool (M) allows you to drag and cut out layers and selections of an image. There are many functions you can perform with the Move Tool such as resizing, aligning, warping an area and more.
7. The Shape Tools
While I don't use the Shape Tools much, I still see how they are useful tools to know. Shape tools allow you to create shapes both simple and complex in Photoshop. These are great for making vector-like graphics in Photoshop for design and mixed media art work.
8. The Type Tool
The Type Tool allows you to create text in Photoshop within your files in Photoshop. This can be useul for especially for designers. When you create a text area in your Photoshop file, a new text layer is automatically created making it easier to edit your text.
9. The Power of The Adjustment Layers
Adjustment Layers are one of the most powerful non-destructive features in Photoshop. With adjustment layers you can adjust the brightness, saturation, color hues, and more in an image. They allow you to stack on multiple image adjustments without affecting the original pixel information or layers below. It's also easy to make further changes to adjustment layers.
10. Masks and Masking
Layer Masks allow you to control the transparency and visibility of specific areas of layers, without erasing away the pixel information of that Layer. This masking another amazing non-destructive feature in Photoshop. When you create a Layer Mask you can paint black to conceal areas of an image and white to reveal areas of an image. Layer masks are also great to use with Adjustment Layers. When you create an Adjustment Layer, a mask is automatically created. If you make a selections and then create an Adjustment Layer, a mask is automatically created with the selection specifically revealed.
11. Filters and Smart Filters
Filters have a variety of uses from retouching to adding effects to an image. The only problem that can occur with Filters is that they can affect the pixel information of an image and are not easy to reverse. This is where Smart Filters come to play. Smart Filters are non-destructive filters applied to layers that are converted to Smart Objects. This allows the ability to easily adjust an applied filter without permanently affecting the pixel information of that layer.
12. Transforming, Rotating, Resizing, Scaling
In Photoshop, you have the ability to transform, rotate, resize and scale layers of an image. These functions are basically extensions of the Move Tool, considering you need to have this tool selected to perform these functions on layers.
13. Cropping, Resizing, and Straightening
The Crop Tool in Adobe Photoshop CC allows you to crop an image to an aspect ratio of your choice. Also, the Crop Tool's guides helps you straighten images. An entire image can be resized by going to Image> Image Size.
14. Undoing and the History Panel
You can undo actions in Photoshop by going to Edit > Undo (CMD+Z). To do undo multiple actions back to back you can go to Edit > Step Backward (CMD+SHIFT+Z) or you can use the History Panel. This Panel allows you to revert to and delete different states of file that have been saved as snapshots.
15. Saving, Exporting, and File Types
Adobe Photoshop allows you to save and export files into different file types and outputs. The simplest way to save files in Photoshop is by going to File> Save or File> Save As. You can export Layers into different file types by going to File> Export.
What tools do you find most important to know in Photoshop?
10 Photoshop Skills You Need to Know
There are tons of things you can do in Photoshop to edit and create incredible images. Some techniques are fairly complex and require a good understanding of the software, but there are a lot of easy things you can do and still get professional results. Here are 10 lesser known, but simple Photoshop features from tutvid that will seriously boost your skills:
1. Face Tool in Liquify
This is a new tool used for liquifying facial features. First, right-click on the layer to convert to smart object. Then go to Filter > Liquify.
Here, you can adjust features. For example, you can resize eyes; by selecting one eye and adjusting the size, the tool will automatically resize both eyes. You can make them wider, narrower, pull them up to make them bulge, whatever you want to do. This goes for any facial feature you select; make the nose bigger or smaller, adjust the jawline, forehead size, lips and smile, etc.
On the right, you’ll see Face-Aware Liquify tools, where you can choose whether you want to work on Face One or Face Two and use the sliders to adjust what you want. Once you’re happy with the result, hit OK to commit. You can also go back to Filter > Liquify and apply a second facial liquify.
2. Color LUTs
If you have created lots of adjustment layers, color lookup tables (LUTs) will essentially allow you to mesh all of those color or adjustment layers into one. You can apply it to another image without having to select all the adjustment layers and copy it over.
Go to File > Export > Color Lookup Tables. You’ll probably get an error here that says the document has no background, but that’s ok. Just select the layer you want to be your background, then go to Layer > New > Background From Layer to set a locked background layer. From File > Export > Color Lookup Tables, enter a description (djk grading is used in this example). Select grid points—medium and high both work really well. Select grid points (CUBE is used here). Then hit OK and give it a file name and save location.
Go to the next photo you’d like to edit. You should be working with RAW files since the color and tonal adjustments can be quite big. If you have, say a 16-bit image, you’ll get better results and smoother color transitions.
Go to Layer > New Adjustment Layer > Color Lookup. You’ll see a new color lookup table adjustment layer. Under 3DLUT file, there are different presets that you can use. You also have Load 3DLUT, where you’ll find your saved settings that will apply all your adjustment layers.
3. Creating the Perfect Selection
This is a quick one but very useful. When you’re creating a a selection in Photoshop, you’re not always going to place it in the exact spot it needs to be so you can hold down the spacebar and move the selection before you commit.
After you’ve placed it, you can still move it if you decide it’s still not quite right. Right click on the selection and choose Transform Selection to get different transform options, like Perspective or Rotate. Now you can scale it or stretch it out to select where you want.
4. Frequency Separation
This is a great non-destructive technique to go in and do highly detailed skin retouching.
Select the image you want to retouch and duplicate the background layer [cmd/ctrl + J] twice. Name the top layer “hi-freq” and the next layer “lo-freq”. Turn off the high-frequency layer and select the low-frequency layer—this is where you want to preserve the colors of the image. Basically, you’re going to try to split the colors of the image from the details of the image.
To preserve the color, blur the image by going to Filter > Blur > Gaussian Blur. Usually, something like 15 pixels is great to soften the details and preserve all the color.
Next, turn on the high-frequency layer and select it. Go to Image > Apply Image. Here, you want to apply your high frequency layer to the low-frequency layer, so select that fro the Layer drop-down menu. A few other settings that will always almost be exactly what you need:
Channel : RGB is good
: RGB is good Blending : Subtract
: Subtract Opacity : 100%
: 100% Scale : 2
: 2 Offset: 128
Set the Blend mode to Linear Light to get an image that is almost exactly like the original, but the advantage is that you can edit the details of the image without affecting the color. Now, you can start retouching. Make sure you’re on the high-frequency layer.
To fix colors, switch over to the low-frequency layer. The Healing Brush tends to leave a trail, so the Clone Stamp tool set to an opacity of 50 or 60 is probably you’re best bet for fixing skin tones. Make the brush smaller to really do a good job.
5. Calculations to Select Hair
Choose your photo and go to Images – Calculations. You want the subject’s hair to appear white, so in the Calculations box, check the boxes to invert both channels.
Then change the different channel colors to see what gives you the most contrast. Output to a new channel, so at the bottom, make sure Result says New Channel. Next, bring up Levels and boost all the blacks and whites.
Set your foreground color to white and use the Lasso tool to make a selection around the interior of the model and fill it with white [alt/opt + backspace/delete].
Select the Brush tool and set the mode to either Overlay or Soft Light. Paint with white over the edges of the subject’s hair to intensify the white. Then set the Brush tool mode back to Normal, switch your foreground color to black and paint around the background. Set the mode back to Soft Light and zoom in to paint around the outer edge of the hair.
Invert the channel [cmd/ctrl + I] and turn on the RGB composite layer, turn off the Alpha channel. On the RGB composite layer, go back to the Layers tab and add a Layers Mask. You can continue to paint over the hair to bring back more edge detail.
6. Selective Sharpening
Say you have a bunch of layers, you can merge them all together [cmd/ctrl + shift + opt/alt + E] to create one sharpening layer. Double click on the Quick Mask mode and check Selected Areas and paint with black where you want to apply fine sharpening.
Hit the letter Q to save the selection. Then go to Select > Modify > Feather and give it around a 250 pixel feather. Hit cmd/ctrl + J to grab the selections and create a new layer. In the new layer, go to Filter > Other > High Pass to apply a high pass adjustment. Change the Blend mode of the layer to Overlay to apply sharpening to your selected areas. If you want to apply more sharpening, just go back to the first sharpening layer and do it again.
7. Color Range in a Mask
This is a great tool to use if you want to change all of one color in a photo to a different color. Select the Mask on an adjustment layer and in the Layer Mask Properties panel, select Color Range. Now, select any area of the photo that you want to constrain the color to.
Then you can paint with black over areas in the Mask layer that you don’t want the color to be applied to and paint with white where you want the color switch to take place.
8. Curves
Create a Curves adjustment layer for your photo. The way curves works is that when you pull up on the line on the graph, you add light to the image; when you pull down, you reduce light.
When you click on a point on the line, you add a point. Just drag the point away to get rid of it. You can create adjustment points on the histogram to change the contrast of different parts of your image.
You can also adjust color channels throughout the picture. Curves is a very powerful way to quickly edit and adjust the contrast, tone, and color in your photos.
9. Adjustment Layers and Blend Modes
Don’t forget to pair adjustment layers with blend modes. You can do something like a Channel Mixer adjustment layer; click on Monochrome in the Layers Properties tab and adjust the sliders and set the Blend mode to Multiply. Reduce and adjust the opacity until it looks good. This will give you a moody, muted effect.
You can also add a Levels or Curves adjustment layer and set the Blend mode to Soft Light. This is a quick way to increase the contrast of your image.
You can change colors of objects, and many other nifty little tricks here.
10. Camera Raw + Temp/Tint & Dehaze
Using dehaze with the Camera Raw Filter can introduce contrast in an interesting way. Right click on your layer and select Convert to Smart Object. Go to Filter – Camera Raw Filter and you can adjust the Temperature and Tint sliders in the dialogue box.
Adjust the Dehaze slider to really boost up contrast. You can also adjust sharpening in Camera Raw.
These are 10 of many amazingly useful and convenient tools in Photoshop. There are a lot of other tips and tricks, and a few more are even mentioned in the video, so give it a watch! What other easy tips do you have when using Photoshop?


