Building a custom 1v1 chat system allows businesses to streamline internal communications, facilitate discussions, and improve collaboration. Whether you're looking to enhance client relations or facilitate team communication, creating a chat application tailored to your business needs can make a big difference. In this article, we'll guide you through building a 1v1 chat using React and integrating it with Tencent Cloud’s chat SDK. Here’s how to do it step-by-step.

Steps to Build a 1v1 Chat Platform
Here are steps to build a 1v1 chat platform:
Create a New React Project
The first step in building your 1v1 chat application is setting up a React project. React is a powerful JavaScript library for building user interfaces, and it provides all the flexibility you need to create a dynamic, responsive chat system.
To begin, you can use the following command to create a new React project using create-react-app. We’ll also use TypeScript for better type safety, but you can choose a JavaScript template if preferred.
npx create-react-app sample-chat --template typescript
This command creates a new project named sample-chat with the TypeScript template. Once the project is set up, navigate into the project directory:
cd sample-chat
With the project set up, you’re ready to start adding the chat functionality.
Install the chat-uikit-react Component
To build the 1v1 chat feature, we will use the chat-uikit-react component, which is provided by Tencent Cloud for easy integration of chat functionalities. This package simplifies the process of integrating chat features into your application.
To install the necessary component, run the following npm command:
npm install @tencentcloud/chat-uikit-react
This will download and install the chat-uikit-react package, which includes pre-built components and tools that you can use to create a chat interface.
Include the chat-uikit-react Component
Once you have installed the necessary dependencies, you can integrate the chat-uikit-react component into your React application. This step involves modifying the App.tsx file to include the chat component.
You will need to replace certain placeholders like SDKAppID, userID, and userSig with actual data. These will be used to authenticate your chat service, but you’ll gather this information in the next steps.
Here's an example of how to modify your App.tsx:
import React from 'react';
import { Chat } from '@tencentcloud/chat-uikit-react';
const App: React.FC = () => {
return (
<div className="App">
<Chat
sdkAppId="your_sdk_app_id"
userId="your_user_id"
userSig="your_user_sig"
/>
</div>
);
}
export default App;
In this code, replace your_sdk_app_id, your_user_id, and your_user_sig with the actual values that you’ll get from the Tencent Cloud console in the following steps.
Create an Application in Tencent Cloud
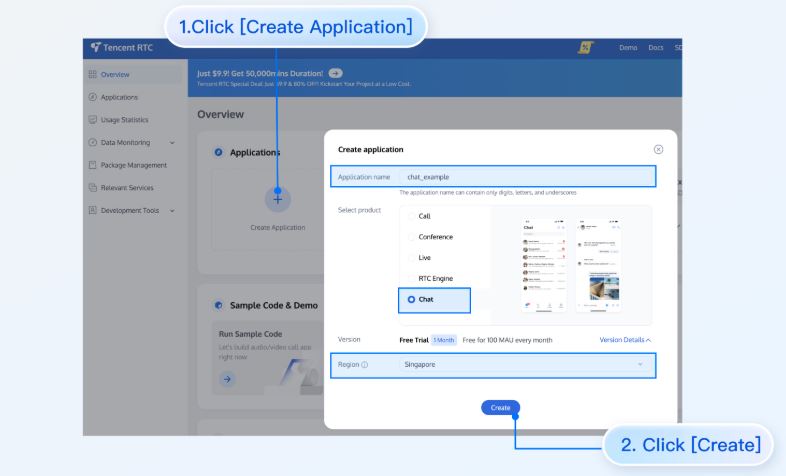
To use the Tencent Cloud chat service, you need to create an application on the Tencent RTC platform. Here’s how:
To begin, log in to your account on the Tencent Cloud Console through the Tencent Cloud website. Then, navigate to the "RTC" (Real-Time Communication) section and click on "Create Application" to set up a new application with a chosen name. Once the application is created, you can find your SDKAppID on the console's overview page.
Obtain userID and userSig
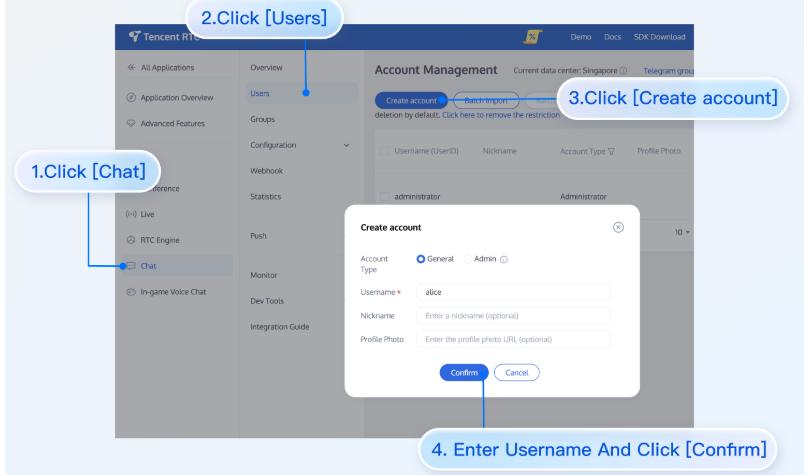
After setting up your application, create a new user under the "Account Management" section. To authenticate the user, generate a userSig by visiting the "UserSig Tools" in the Tencent Cloud Console, entering the userID, and generating the token. This userSig serves as a verification token to authenticate the user and initiate the chat session.
Start the Project
With all the credentials in place, it’s time to start your project. Replace the placeholder values in your App.tsx file (SDKAppID, userID, and userSig) with the actual values obtained from the previous steps.
Once everything is set up, run the following command to start your project:
npm run start
This will launch your application, and the chat interface should now be live.

Send Your First Message
To test the chat functionality:
1.Click on the "+" button on the left side to start a new 1v1 chat.
2.In the search box, enter the userID of the person you want to chat with and press Enter.
3.Type your message in the input box and hit Enter to send it.
Now, you have successfully built a 1v1 chat system for business discussions!
Conclusion
By following these steps, you can create a powerful 1v1 chat communication tool that can be used for business discussions and real-time collaboration. Building your own chat system offers flexibility and control over how you manage conversations, making it a great solution for companies looking for custom chat applications. With React and Tencent Cloud's chat SDK, you can create a seamless, interactive chat experience that supports efficient business communication.


